


Our Solution
We provide solutions for your problems
Optical Reconstruction and Material Innovation
📌 Background
A luxury home décor brand is getting ready to debut a line of more lifelike LED candles, intended to be the centerpiece offered in their stores. They ran into some hurdles with three separate suppliers, though.
Supplier A’s candles displayed a flame that resembled a fixed flashlight beam. Supplier B’s wax droplets had the appearance of inexpensive plastic molds.
The client’s specifications were simple, but not easy to achieve: “We need a flame that breathes—a flame that flickers unpredictably, as if caught in a gentle wind.”
We need glowing wax—translucent so the light can penetrate walls. We need wax droplets that look natural, not machine pressed.”
They wanted the feel of a real candle but didn’t want to take on fire hazards.
Our approach: “Optical Reconstruction and Material Innovation.”
Rather than sending a typical product catalog, we arranged a video conference, bringing in our R&D team. We then put forth a complete, in-house redesign, built on two key elements:
Optical Reconstruction (Flame)
The issue: Standard candles employ a single “F5” circular LED, resulting in a harsh, concentrated light.
Our solution: We swapped it out for a multi-angle SMD LED, coupled with a custom light guide.
The outcome: Evenly dispersed illumination.
By programming the IC chip to achieve 5 levels of gradual dimming, we simulated the natural “breathing” flicker of a real candle, sometimes bright, sometimes dim, like the natural flow of the candle and wick.
Material Innovation (Luminescence)
Problem: Standard ABS plastic is opaque. When the LED is on, the candle looks like a plastic tube with a light on top.
Our Solution: We abandoned pure ABS. Instead, we developed a mixture of transparent PP modifiers.
Result: The outer shell feels cool to the touch, like wax, with a realistic feel. When the LED is on, the light penetrates the shell, creating a warm, translucent halo effect—just like a burning real candle.
Result: Each candle has a unique wax droplet “fingerprint.” No two candles are exactly alike.
✅ Final Results
Instant Sample Approval: Upon receiving the sample, the customer’s first reaction wasn’t to open it, but to touch it to see if it was truly made of wax. Higher Pricing: The customer’s initial wholesale budget was $12 per candle. Seeing its realistic effect, they positioned it as a high-end decorative item. Ultimately, they set the retail price in their boutique at $29.90 (compared to the average price of $9.90 for a regular electronic candle).
Bestseller: This product became an “unexpected hit” at their holiday catalog launch.
Customer Testimonial:
“You’ve made more than just a candle; you’ve created an emotion. It’s not a flashlight in a plastic shell, but an atmospheric work of art.”
👉 Key Selling Points (Applicable to Your Website/Marketing)
“We don’t produce ‘canned flashlights.’ We recreate the romance of candlelight. Each candle is a miniature sculpture of light and material.”

Solving the “Remote Interference” Problem
📌 Background
A luxury hotel in the Middle East needed to install 1,000 electronic candles in its guest rooms. They wanted guests to be able to easily control the candles, but the previous supplier had several problems:
The remote control range was only 3 meters (the room depth exceeded 5 meters).
The remote control signal would cross between rooms—guests could control their neighbors’ candles.
A guest complained: “The candles lit up by themselves in the middle of the night. It felt very eerie.”
The hotel’s requirements were clear:
100% signal isolation, a remote control range of over 8 meters. Our fix: “RF + Infrared Dual-Mode Upgrade”
We tailored a solution for large hotels:
1.Improved Remote Control Range:
We swapped out the standard infrared module for a 433MHz RF module. The actual effective range reached 10 meters—effective transmission even through walls.
2.Signal Isolation:
Each room was given a unique digital address, a total of 1,000.When the system was set up, each remote control was linked to its specific candle. Zero cross-interference—even with hundreds of devices operating simultaneously.
✅ Final Result
All technical challenges were resolved in a single production run.
The hotel expanded the project: adding waterproof candles for the poolside and banquet hall.
No interference complaints were received after installation.
Client Testimonial:
“Other suppliers sell us candles, you sell us a system.”
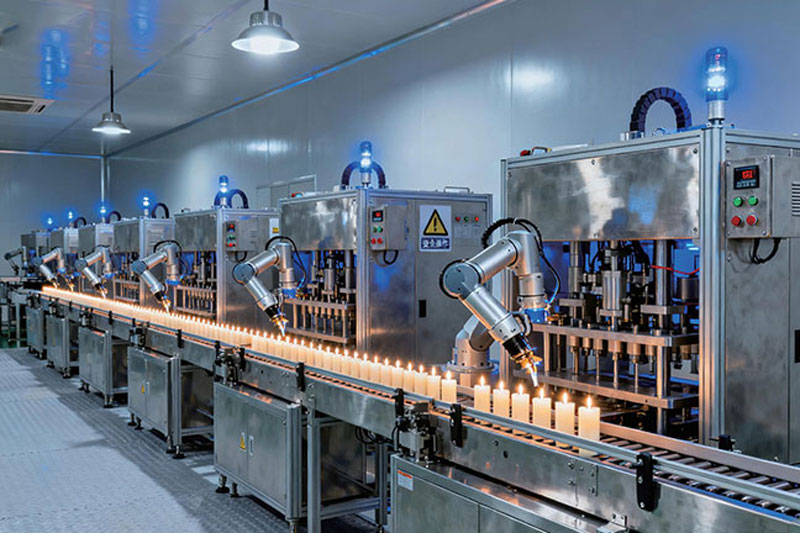
Electronic Candle Shell Injection Molding Process
Injection molding is a highly efficient manufacturing method suitable for the mass production of flameless candles.
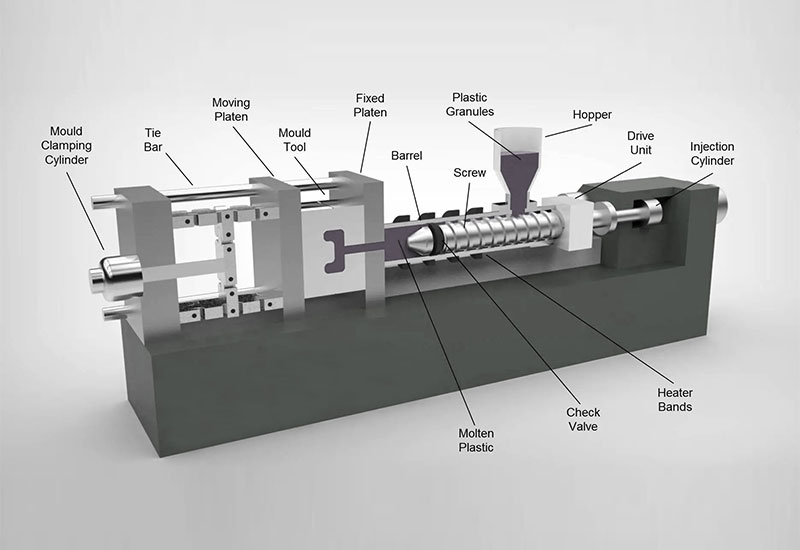
First, pour the PP raw material into a heating bath, and melt, then injected into a steel mold to form the shell. After cooling, the mold is opened, and the candle shell is complete.
The advantages of this process are its speed; the entire production process typically takes only 30-60 seconds, making it ideal for mass production. Furthermore, it offers advantages such as high precision, consistent product dimensions, low labor costs, and a high degree of automation.
In this step, we also can use real wax instead of the PP material.
Next comes the electronic component part of the candle. First, the PCB board is assembled. Then, all the wicks are encapsulated within the electronic candle body, including installing the flame head and checking the circuitry. Finally, the battery is installed as needed.
Production Process
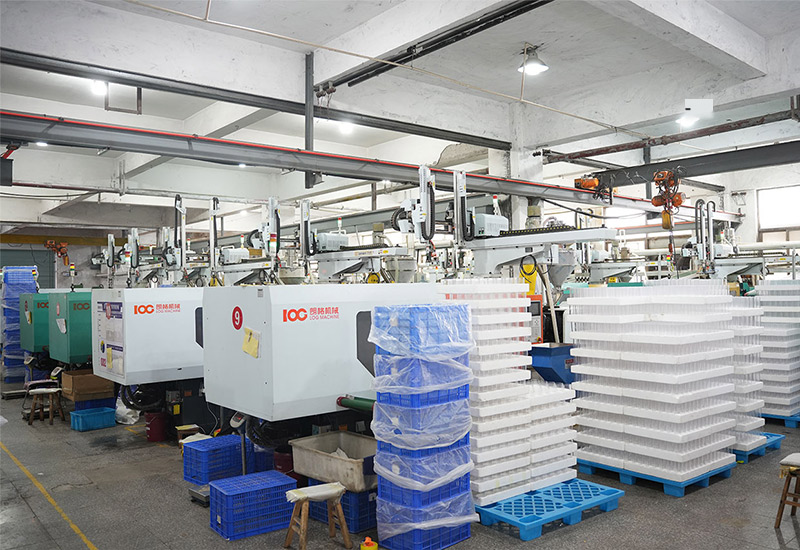
Phase 1: Candle Body (Shell) Manufacturing
The candle body is the core of the shell, which would make the product’s texture and realism.
Material: The polypropylene (PP), molded in one piece using an injection molding machine.
Injection Molding: With PP plastic granules heated and melted, then injected into a precision steel mold under high pressure. After cooling, a precisely shaped plastic candle body is obtained. Surface treatment is required to achieve a waxy texture.
Surface Treatment and Finishing: Make the candle body look more like a real candle.
Coloring – Cutting – Detail Sculpting: After this series of steps, the candle body is complete.
Phase 2: Electronic Mechanism (Functional Components) Preparation
Components: Depending on the product’s functional requirements, prepare LED lights (monochrome or multicolor), integrated circuit chips (for controlling the flashing pattern), battery contacts, switches, resistors/capacitors, etc. For advanced simulated flame models, magnets, electromagnetic coils, and lever mechanisms may also be included.
PCB Board: Micro-integrated circuits, resistors, and other components are mounted onto a printed circuit board (PCB) using surface mount technology (SMT). The assembled board will be wave soldered or reflow soldered to securely solder the components onto the PCB.
Functional Testing: Using a simple power supply and testing tools, the soldered board will undergo functional testing to ensure the LED lights function properly, the integrated circuit program runs smoothly, and the switch response is sensitive.
Third Stage: Final Testing and Packing
Final Assembly: The tested electronic components will be installed into the prepared hollow candle body. If the product is waterproof, sealant will be applied to the seams, and a silicone gasket will be used at the battery cover. The flame head will be positioned above the LED lights and protrude from the pre-drilled hole at the top of the candle.
Final Testing: The power switch, light modes, and remote control functions will be tested again by an external power supply to ensure they function correctly.
Visual Inspection: The candle body will be inspected to guarantee there is no scratches and damage, uniform assembly gaps, and a straight flame head.
Packaging and Warehousing: Products that pass final testing will be labeled (e.g., CE marks), packed and finally stored, ready for shipment to the European, American and all the other markets.